Modern-Striped Twin Quilt - Session #1 of 4

Skills Attained: piecing a quilt, binding, tying-off a quilt, slip stitch
Supplies/Materials: See below.
The next few posts are dedicated to anyone who wishes to delve further into the world of sewing. Perhaps you have tackled a few basic projects, and now you would like to try something a little bigger. This modern-striped twin quilt may be the perfect project for you! This is a great beginner quilt that will teach you the basics of piecing a quilt together, tying-off a quilt, and binding the quilt.
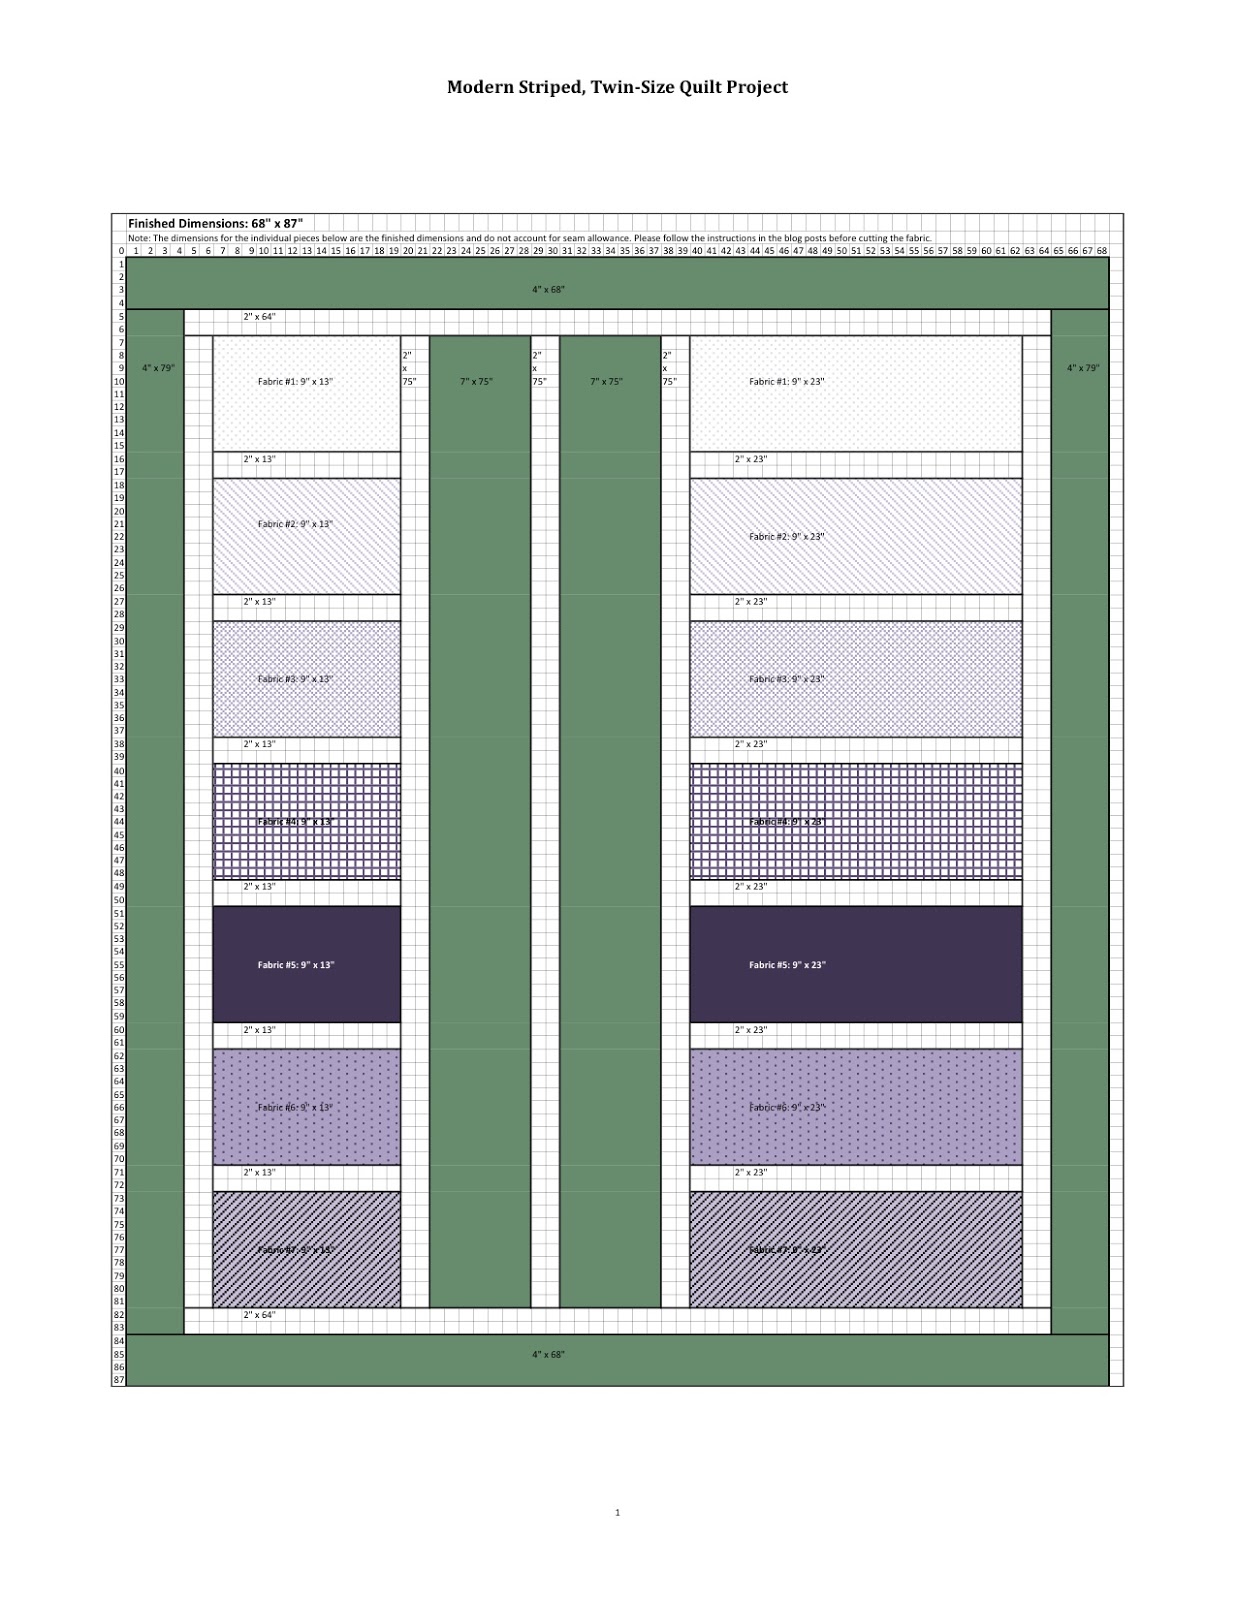
Here is the project design and dimensions. The finished, twin-size quilt is 68" x 87".
The instructions for this project will be broken down into four sessions. I will post one session per week over the next four weeks. The four sessions are as follows:
- Cutting the Fabric
- Piecing the Quilt Top
- Sewing the Borders and Preparing for Finishing
- Finishing the Quilt: Tying and Binding
Here is a detailed list of supplies and materials you will need for the project:
- Sewing Machine
- Scissors
- Straight Pins
- Safety Pins
- Pencil/Chalk
- Needles: Quilt Needle and Tapestry/Embroidery Needle
- Iron and Ironing Board
- Rotary Cutter, Mat, and Ruler
- *Fabric for Horizontal Strips: 1/3 of a yard of 7 types of fabrics. You can choose up to 7 different types of fabric for this. Let your imagination run wild. You can use any pattern or color. You can choose 7 different fabrics, or you can use fabrics multiple times. Take a look at the quilt design above to get a better idea of how the fabrics will be used. You don't have to use fabrics in the same color scheme; choose whatever you would like.
- *Fabric for Vertical/Center Strips & Outside Borders: 2 1/2 yds. You will be using the same fabric for the two center strips as well as the outer border. If you want to use a different fabric, you can definitely do that. You will just need 2 yards of each type of fabric.
- *Fabric for White Borders: 2 1/4 yds. A basic cotton (or muslin) fabric will suffice. But, you can certainly use something else.
- *Fabric for Backing: 4 yds of fabric OR full-size flat sheet. You can buy 4 yards of whatever type of fabric you would like (again, cotton or flannel), but you could also use a full-size flat sheet. Some twin flat sheets may work, but make sure the dimensions are at least 68" x 87". With a flat sheet, you wouldn't have to piece any fabric together.
- *Fabric for Binding: 3/4 yd. This is the small strip of fabric (kind of like a border) that is used to "bind" the front to the back. You can use any of the fabrics you already picked out, or you can choose a totally different fabric; whatever you prefer. You will only see about 1/2 inch wide of this fabric, so I wouldn't choose anything with a big print.
- Thread: one spool. Use any color thread you would like. You will just need one spool. No need for an expensive kind; the "all-purpose" thread will suffice.
- Embroidery/DMC Floss for tying quilt. Choose any color you would like as this will be used to tie the quilt at the very end. You will be tying-off the quilt rather than machine or hand quilting.
- Batting: twin size (72" x 90"). Batting can be purchased off of a spool or pre-packaged. If you purchase it pre-packaged, it will say "twin size". If you purchase from a spool and have it cut, make sure you get it cut for a twin-size blanket (72" x 90"); you won't want to piece this together. Polyester batting is the cheapest. You can also purchase cotton batting, which is more expensive. There are 60/40 or 80/20 blends as well. Feel free to purchase whatever kind you would like.
*Note on Fabric: The dimensions for the fabric above assume a 45" width. So, be mindful of the fabric width when you are purchasing the fabric. This is especially important for the backing fabric; if the fabric width is less than 45", then you will need to purchase an additional two yards of fabric. This will require additional piecing for the back fabric.
*****
Let's get started on the first session...
Session #1: Cutting the Fabric
In this session, you will only be cutting the fabric for your quilt top: horizontal strips, vertical/center strips, outside border, and white borders. We will cut the remaining fabric at a separate time.
Washing the Fabric
Before cutting the fabric, wash and iron the fabric. This step will prevent the quilt from shrinking unevenly when you wash your finished quilt in the future. Most fabrics will shrink to some extent when washed, and when using various types of fabrics, each fabric may shrink differently. If you did not wash your fabric before cutting it, then you may run into some issues after you have sewn your quilt together and wash it for the first time. The long and short of it all is to simply wash your fabric before you cut.

Cutting the Fabric
After the fabric is washed and ironed, cut the fabric using a rotary cutter.
Note on Seam Allowance: The dimensions of the cut pieces are 1/2” larger for both the length and width than the final dimensions to allow for seam allowance. This pattern calls for a ¼” seam allowance on each side. So, the 9 ½” x 13 ½” piece will result in a 9” x 13” finished piece after sewing is complete.
Using the rotary cutter and mat, cut the fabric into the following dimensions: (For further instruction, visit my previous post on Using a Rotary Cutter.)
· Horizontal Strips (Cut each of the 7 fabrics into the following):
- (1) - 9 ½” x 13 ½”
- (1) - 9 ½” x 23 ½”
· Vertical/Center Strips & Outside Borders:
- (2) - 7 ½” strips (vertical/center strips)
- (4) – 4 ½” strips (outside border)
Cut the strips the length of the longest side, so that your strips 2 1/2 yards long. You will cut the vertical strips to length after you have sewn the strips for the horizontal pieces together (Session #2 & #3).
· White Borders:
- (10) - 2 ½” strips
Cut the strips the length of the longest side, so that your strips 2 1/4 yards long. Once the 2 ½” strips are cut, cut six (6) pieces 13 ½” long and another six (6) pieces 23 ½” long. You will cut the remainder of the strips the desired length at a later time
(Session #2 & #3).
 |
| Cut Fabric |
Congratulations! You have completed the first step of the quilt. Next time, you will learn how to piece the top of the quilt together.
0 Response to "Modern-Striped Twin Quilt - Session #1 of 4"
Post a Comment