Drying Chili Peppers and My Basic Chili Recipe
A couple of weekends ago my mom visited. She brought with her a bucket of hot red chili peppers from my grandma's garden. I decided to dry them. At first, I contemplated stringing them up to dry in my basement. That seemed like a lot of work, and with two curious young children and a puppy in this house, I thought that it also seemed like a potential danger.(Our puppy had already sampled a pepper the night they arrived. Lots of sneezing and retching followed. Not good!)
Then I remembered that months ago, my grandma had given me her food dehydrator. It was stashed in my basement under some boxes after our move last February. When I got the dehydrator, I had a whole list of things I wanted to try: fruit leather, beef jerky, yogurt... Instead we bought a new house, moved, and my list of potential dehydrating projects was pushed to the back burner. These peppers seemed to be the perfect reason to dust off this appliance.
After reading up on how to dry peppers in the dehydrator, I began by washing the peppers, then cutting off the tops. Note: if the peppers are spicy, I suggest that you wear rubber gloves while handling them.
I arranged the peppers on the trays that came with the dehydrator.
Then I set the dehydrator between 135 and 145 degrees and slid the trays into place.
I was concerned about the fumes that might result from drying the peppers indoors. Luckily, we have a covered utility porch on the back of our garage. I set the dehydrator on this porch to save my family from burning eyes and sneezes.
I consulted Scott Robert's Ultimate Guide to Drying Hot Peppers for direction on temperature setting and drying time. His recommendation was 8-12 hours. I'm not sure if it was my dehydrator or that the peppers had a high moisture content, but my peppers took much longer to dry. I think that these dried for 18-20 hours at 140 degrees. I wanted them nice and brittle so that I could grind some of them into powder.
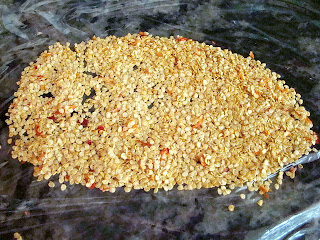
Back in the kitchen, I removed the seeds from the dried peppers. They fall out pretty easily once the peppers are dry.
I collected all of the seeds and wrapped them up. I hope to plant some of them in my garden next year.
A few of the larger peppers didn't dry completely. They had the consistency of a sun-dried tomato. I bagged those too and planned to figure out what to do with them later. Unfortunately, when I checked them yesterday, they had turned moldy. I probably should've put them into the fridge....
The rest of the dry seeded peppers went into my electric coffee grinder. In batches, I ground them to a fine powder.
These chilies were super HOT!I decided to do a taste test with my chili powder against a couple of the other chili powders in my spice rack. I tried cayenne pepper and ancho chili pepper against my freshly ground hot chilies. The first two pepper powders packed some heat, but when I tested a few particles of my chili powder on my tongue, there was a 5-alarm reaction! My mouth was still burning at least 4 hours later.
A little of this chili powder will go a long way in spicing up recipes like my homemade chili.
I originally posted my chili recipe on this blog almost 3 years ago. This week, chili also happens to be the subject of the food column I write for a local news publication. After typing the article, I decided that it's time to re-visit that recipe here on Krista's Kitchen. So here goes....
From my article:
We’re barely past Labor Day, but the chill in the air and the looming gray clouds overhead this week make me realize that fall is just around the corner. All week I have been craving my favorite fall foods; dishes that call for apples and squash, hearty stews and comfort foods.
Yesterday, I whipped up a big pot of chili. Some people wouldn’t classify chili as comfort food, but to me, there’s nothing better than a steaming bowl of homemade chili with all of the fixings to warm me up at the end of a gloomy fall day.
There are many schools of thought when it comes to chili. Some feel that the spicier the chili is, the better it tastes, while others prefer a milder flavor. Some like it thick and some want it juicy. Some love the beans and some could do without. And there is a whole group of people who love their Chili Mac.
For the record, I am not from this pasta-loving sect of chili connoisseurs. Personally, I believe that macaroni is the quickest way to ruin a bowl of chili. In fact, I get a little annoyed when served chili-flavored pasta when I order a bowl of chili. If I wanted goulash, I’d ask for goulash. I want chili, darn it!
Now don’t you Chili Mac lovers get all offended. I’m just proving my point that chili is very much a personal preference kind of dish. Note: I do make an exception to the “no pasta in chili" rule when it comes to my beloved Cincinnati Chili.
Now that we have established that the perfect bowl of chili is different for each and every one of us, today I am providing my basic chili recipe. It’s not terribly spicy, with a hint of sweet. It is tame enough for a toddler, yet flavorful enough to be a crowd pleaser.
Although the basics of my chili always remain the same, it never turns out exactly the same way. I’m always slightly switching it up. Sometimes I pour in Spicy V8 in place of tomato juice. Sometimes I dump in a can of chopped green chilies or a jar of salsa. And sometimes I add taco seasoning along with the chili powder or sprinkle in different types of ground hot peppers. This basic chili recipe provides the opportunity to really make this dish your own!
The key to great chili is to taste as you go. Start with the basic recipe and then add in more salt, sugar and spices to suit your personal tastes. Just keep in mind that the flavors will meld and some spices will intensify as the chili simmers. I recommend waiting 15-30 minutes between each flavor-enhancing addition and tasting again before making adjustments to the recipe.
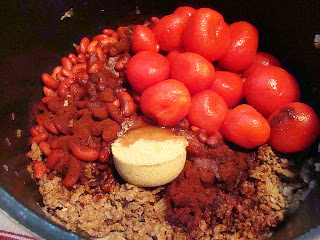
Here are the building blocks for my basic chili recipe: ground beef, onion, whole tomatoes, kidney beans, tomato juice, brown sugar, and of course, chili powder.
After browning the beef with the onion, stir in the spices. Then add the tomatoes and beans.
"Smoosh" the tomatoes as you stir them into the mix. Then heat the mixture to a sizzle.
Pour in the tomato juice and stir until combined. Heat the chili to a boil, then simmer for at least an hour. Taste and add seasonings as necessary while the chili cooks.
Serve with your favorite chili toppings.
To freeze the chili, cool to room temperature first. Then divide the chili into dinner portion freezer containers. A funnel is a good tool to avoid a mess.
I prefer plastic quart-sized freezer containers for freezing chili and soup. I was out of plastic containers this week, so I used quart-sized canning jars instead. Be sure to only use wide-mouth jars and allow plenty of head-space for expansion as the chili freezes or you will risk the frustration of broken jars.
Freezer bags also work well for preserving chili. Label all containers with the contents and date and then freeze immediately. Bags should be frozen flat and can be stacked later.
Here's the recipe:
Chili
2 lbs. Ground beef
1 medium or large onion, diced
salt and pepper
In a large pot, brown beef and onion. Salt and pepper to taste. Drain. Return to pot.
Add:
80 oz. of tomato juice or 1 ½ large cans (subject to how thick or fluid you prefer your chili)
29 oz. can of whole tomatoes
2- 15.5 oz. cans of kidney beans (rinsed and drained)
1/4 c. brown sugar, packed
1/4-1/3 c. chili powder
Add the spices and sugar to the hamburger mixture. Stir until combined and heat until sizzling. Then add the tomatoes. Crush them up a bit as you stir them into the beef. Dump in the beans and stir. Add the juice. Bring to a boil, then simmer for at least an hour before serving, adjusting the flavors to taste as the chili cooks.
My perfect bowl of chili is topped with a little shredded cheddar or American cheese, Fritos, and a dollop of sour cream. Once I've perfected the chili in the pot, it's all about the fixings!
This recipe makes enough for me to freeze half, serve the other half for dinner, and still put leftovers in the fridge for lunch the next day.


0 Response to "Drying Chili Peppers and My Basic Chili Recipe"
Post a Comment