Create a DIY Cold Frame with Old Windows
It might feel cold, rainy and let's-face-it -- HORRID outside, but surely you can feel that little bit of spring in the air. That tiny bit of fresh air from the south that smells of tulips and peonies and fresh rain and sprouting grass. Spring is coming and it will come faster than you can imagine. Those boring days of winter will be past and the workloaded days of blissful spring will be upon us.
If you are anything like me, you want to rush things a bit. Winter is so sad and depressing and spring is just...well...everything. There can't be anything better than the brilliant new life we get to joy in every March, April and May. So to push the season way into early March I get started with seed starting, bulb forcing, branch forcing and cold frames. Today we are going to focus on those cold frames!
Cold frames are simply a planting area or box, with glass over top to warm up the soil and air around the baby plants. When used in early apring or late fall, they can extend your planting period by quite a lot. The problem? Cold frames can be expensive! THAT my friends is why I am into DIY gardening. If any area of life were more suited to DIY solutions as opposed to costly installations -- the garden would be it. So instead of spending my hard earned bucks on cold frames (that are typically too small anyway), I use windows!
 Now, I happened to stumble upon these windows hidden away behind our shed and there were plenty for multiple cold frames, a giant food dehydrator and a glass trap when playing Capture the Flag (sorry Nick!). If you don't have old windows lying around (aka - you are normal!) check out your neighbors on garbage day. windows are a common site -- particularly old, useless windows. You should be careful of very old windows with peeling paint. These might contain lead and are not safe for use in your vegetable garden. Anything vinyl or aluminum is perfect!
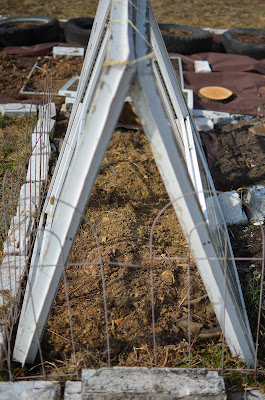
Once you have scored some old windows, it is time to pick a location for your cold frames and assemble the pieces. I chose to use them directly in my vegetable garden, hidden away from sight from the neighbors and with soil that was already prepped for planting. I simply took four windows of the same size, leaned them against each other and secured the top.

It is simply a matter of looping twine or wire through the top sections of the windows to secure them against wind. These windows are fairly heavy, so their weight alone, leaning against each other provides a lot of stability. You might notice that the upper portions of the windows are left open, as well as the sides. Here in zone 6, the weather has warmed up quite a bit by March, so I don't need a fully enclosed frame. The windows lock in enough warmth from sunlight, while the open area provide some air flow for the plants.
If you are anything like me, you want to rush things a bit. Winter is so sad and depressing and spring is just...well...everything. There can't be anything better than the brilliant new life we get to joy in every March, April and May. So to push the season way into early March I get started with seed starting, bulb forcing, branch forcing and cold frames. Today we are going to focus on those cold frames!
Cold frames are simply a planting area or box, with glass over top to warm up the soil and air around the baby plants. When used in early apring or late fall, they can extend your planting period by quite a lot. The problem? Cold frames can be expensive! THAT my friends is why I am into DIY gardening. If any area of life were more suited to DIY solutions as opposed to costly installations -- the garden would be it. So instead of spending my hard earned bucks on cold frames (that are typically too small anyway), I use windows!
Once you have scored some old windows, it is time to pick a location for your cold frames and assemble the pieces. I chose to use them directly in my vegetable garden, hidden away from sight from the neighbors and with soil that was already prepped for planting. I simply took four windows of the same size, leaned them against each other and secured the top.
It is simply a matter of looping twine or wire through the top sections of the windows to secure them against wind. These windows are fairly heavy, so their weight alone, leaning against each other provides a lot of stability. You might notice that the upper portions of the windows are left open, as well as the sides. Here in zone 6, the weather has warmed up quite a bit by March, so I don't need a fully enclosed frame. The windows lock in enough warmth from sunlight, while the open area provide some air flow for the plants.

0 Response to "Create a DIY Cold Frame with Old Windows"
Post a Comment