PPP - How to RESIZE photos the quick and easy way!
So you might not think re-sizing your photos is all that important. I mean you just download the photos onto the computer, upload them to edit, save and insert the photos into photobooks, blog posts or have prnts made. Easy-peasy, right? Hold up there little pony. Sometimes you can get away with that, but oftentimes you are kicking yourself in the foot by not resizing your photos.
Why?Well, if you are a blogger or if you are a photo-lover saving lots of pictures on your computer, you are going to slow down your blog and slow down your computer if you keep massive photos on either. Now here is the thing -- when you open that photo in photoshop, it isn't going to look huge. It is going to look normal, but trust me, those files coming off of your camera are often HUGE! If you are shooting with a DSLR, the files tend to be automatically set to be larger than a point and shoot, but you can adjust picture size in your camera, no matter what style you own.
Should you shoot smaller photos to begin with?
Well, that depends on what you are shooting. Professional photographers often use REALLY big photo files, often shooting in raw, so that they can have massive files to blow up into canvases and other large prints. You might also want to shoot large files in case one or two of those photos turn out *PERFECTLY* and you want to blow it up to a large size too. So my advice is to shoot in a medium or large file size (usually around 3-6 MP). Anything larger than that is great for billboards, but you probably don't need to be using that much space on your memory cards. Have I lost you yet? No? Hold on, because we are about to get into resizing!How big should your photos be on your computer?
Well, let's start with blogs. Blogs are all a set width -- some are 600 pixels wide, some go up to 900. Sizes vary, but each blog has a set width in the posting areas. You want your photo to BE that size. If your photos are too small, the photos will look dinky on your blog, or if you size them to "large" or extra-large" in your blogging platform, the quality will go down. For instance, if your blog post area width is 900 pixels and you size a photo to be 300 pixels, when you use that photo in an extra-large setting, you get this:On the other hand, if you use that very same photo sized 900 pixels (the exact width of this blog), you can tell your blogging platform to use the photo at "original size" and you get this:
Big difference eh??
If you want that same photo, nice and sharp, but not so big, you can use the x-large setting on your blogging platform.
Don't go much smaller for your best photos though because they will lose their impact!
So what does this mean for non-bloggers? Well, if you are emailing photos and saving them on your computer, this matters to you too! Saving those huge files is going to slow down your computer, and yuo will only be able to email a few photos at a time as opposed to a whole bundle of them. If you are just taking snapshots, and are not using your files to make large prints, you can make them smaller!!
How do I actually make the files smaller?
 There are many ways to do this, but I am going to show you three. First off? Let's change the size in photoshop.
1. Open Your Photo
2. Go to Image > Image Size
3. Change the Pixels and Save
(Notice that the original pixels are like 3,000 something. Way too big for a blog! Change that number to 900 and the height will adjust itself.)
 Easy, right?
Yes, but it can get time consuming if you are doing lots of photos. You might have noticed in my FREE set of actions, there are re-sizing buttons. Simply open your photo, then hit either 750 vertical, 750 horizontal, 900 vertical or 900 horizontal to instantly resize your photo.
How do you know which to utilize?
If you are blogging, check out your blog's width and size accordingly. If you are resizing a landscape photo, or horizontaly aligned photo (like the ones to the right), hit horizontal. If you are working with portrait, or "up and down" photos, hit vertical.
What if you have a TON of photos to resize?
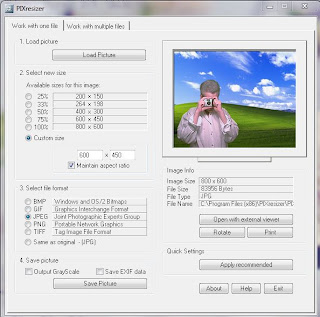
When I have a whole folder of hundreds of photos that I want to quickly resize, I use a tool called Pixresizer. There are a ton of products on the market that will do the same thing, but this one is free and quick and I have not found anything better. You can upload an entire folder of photos, and then resize them and save them to a new folder. Easy as pie!Just make sure you click "work with multiple files" on that top tab and you will be good to go!
You can download Pixresizer HERE.
(BTW, pixresizer is not sponsoring this in any way)
You can download the PPP FREE Photoshop Actions right HERE!
Questions?
Please, please ask and I will answer in the comments or facebook!


0 Response to "PPP - How to RESIZE photos the quick and easy way!"
Post a Comment